欢迎您访问我爱IT技术网,今天小编为你分享的编程技术是:【WPF自定义漂亮的按钮样式】,下面是详细的分享!
WPF自定义漂亮的按钮样式
<Application x:Class="WPFButton.App"
xmlns="http://schemas.microsoft.com/winfx/2006/xaml/presentation"
xmlns:x="http://schemas.microsoft.com/winfx/2006/xaml"
StartupUri="Window1.xaml">
<Application.Resources>
<!--定义按钮样式-->
<Style TargetType="Button">
<Setter Property="Foreground" Value="Black"/>
<!--修改模板属性-->
<Setter Property="Template">
<Setter.Value>
<!--控件模板-->
<ControlTemplate TargetType="Button">
<!--背景色-->
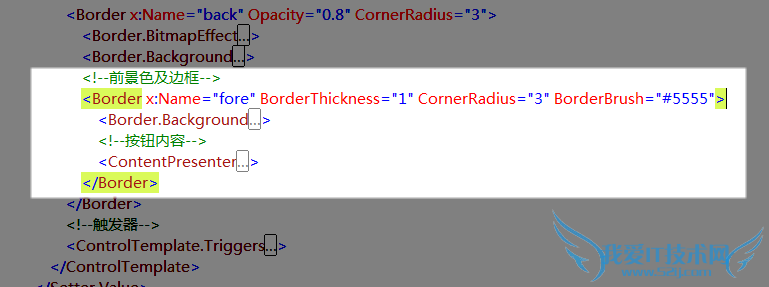
<Border x:Name="back" Opacity="0.8" CornerRadius="3">
<Border.BitmapEffect>
<OuterGlowBitmapEffect Opacity="0.7" GlowSize="0" GlowColor="{Binding RelativeSource={RelativeSource TemplatedParent}, Path=(Button.Background).(SolidColorBrush.Color)}" />
</Border.BitmapEffect>
<Border.Background>
<LinearGradientBrush StartPoint="0,0" EndPoint="0,1.5">
<GradientBrush.GradientStops>
<GradientStopCollection>
<GradientStop Color="{Binding RelativeSource={RelativeSource TemplatedParent}, Path=(Button.Background).(SolidColorBrush.Color)}" Offset="0"/>
<GradientStop Color="{Binding RelativeSource={RelativeSource TemplatedParent}, Path=(Button.Background).(SolidColorBrush.Color)}" Offset="0.4"/>
<GradientStop Color="#FFF" Offset="1"/>
</GradientStopCollection>
</GradientBrush.GradientStops>
</LinearGradientBrush>
</Border.Background>
<!--前景色及边框-->
<Border x:Name="fore" BorderThickness="1" CornerRadius="3" BorderBrush="#5555">
<Border.Background>
<LinearGradientBrush StartPoint="0,0" EndPoint="0,1">
<GradientBrush.GradientStops>
<GradientStopCollection>
<GradientStop Color="#6FFF" Offset="0.5"/>
<GradientStop Color="#1111" Offset="0.51"/>
</GradientStopCollection>
</GradientBrush.GradientStops>
</LinearGradientBrush>
</Border.Background>
<!--按钮内容-->
<ContentPresenter x:Name="content" HorizontalAlignment="Center" VerticalAlignment="Center" Content="{TemplateBinding Content}">
<ContentPresenter.BitmapEffect>
<DropShadowBitmapEffect Color="#000" Direction="-90" ShadowDepth="2" Softness="0.1" Opacity="0.3" />
</ContentPresenter.BitmapEffect>
</ContentPresenter>
</Border>
</Border>
<!--触发器-->
<ControlTemplate.Triggers>
<!--鼠标移入移出-->
<Trigger Property="IsMouseOver" Value="True">
<Trigger.EnterActions>
<BeginStoryboard>
<Storyboard>
<DoubleAnimation To="6" Duration="0:0:0.2" Storyboard.TargetName="back" Storyboard.TargetProperty="(Border.BitmapEffect).(OuterGlowBitmapEffect.GlowSize)" />
<ColorAnimation To="#AFFF" BeginTime="0:0:0.2" Duration="0:0:0.2" Storyboard.TargetName="fore" Storyboard.TargetProperty="(Border.Background).(LinearGradientBrush.GradientStops)[0].(GradientStop.Color)" />
<ColorAnimation To="#3FFF" BeginTime="0:0:0.2" Duration="0:0:0.2" Storyboard.TargetName="fore" Storyboard.TargetProperty="(Border.Background).(LinearGradientBrush.GradientStops)[1].(GradientStop.Color)" />
</Storyboard>
</BeginStoryboard>
</Trigger.EnterActions>
<Trigger.ExitActions>
<BeginStoryboard>
<Storyboard>
<DoubleAnimation Duration="0:0:0.2" Storyboard.TargetName="back" Storyboard.TargetProperty="(Border.BitmapEffect).(OuterGlowBitmapEffect.GlowSize)" />
<ColorAnimation Duration="0:0:0.2" Storyboard.TargetName="fore" Storyboard.TargetProperty="(Border.Background).(LinearGradientBrush.GradientStops)[0].(GradientStop.Color)" />
<ColorAnimation Duration="0:0:0.2" Storyboard.TargetName="fore" Storyboard.TargetProperty="(Border.Background).(LinearGradientBrush.GradientStops)[1].(GradientStop.Color)" />
</Storyboard>
</BeginStoryboard>
</Trigger.ExitActions>
</Trigger>
<!--按钮按下弹起-->
<Trigger Property="IsPressed" Value="True">
<Trigger.EnterActions>
<BeginStoryboard>
<Storyboard>
<DoubleAnimation To="3" Duration="0:0:0.1" Storyboard.TargetName="back" Storyboard.TargetProperty="(Border.BitmapEffect).(OuterGlowBitmapEffect.GlowSize)" />
<ColorAnimation To="#3AAA" Duration="0:0:0.1" Storyboard.TargetName="fore" Storyboard.TargetProperty="(Border.Background).(LinearGradientBrush.GradientStops)[0].(GradientStop.Color)" />
<ColorAnimation To="#2111" Duration="0:0:0.1" Storyboard.TargetName="fore" Storyboard.TargetProperty="(Border.Background).(LinearGradientBrush.GradientStops)[1].(GradientStop.Color)" />
</Storyboard>
</BeginStoryboard>
</Trigger.EnterActions>
<Trigger.ExitActions>
<BeginStoryboard>
<Storyboard>
<DoubleAnimation Duration="0:0:0.1" Storyboard.TargetName="back" Storyboard.TargetProperty="(Border.BitmapEffect).(OuterGlowBitmapEffect.GlowSize)" />
<ColorAnimation Duration="0:0:0.1" Storyboard.TargetName="fore" Storyboard.TargetProperty="(Border.Background).(LinearGradientBrush.GradientStops)[0].(GradientStop.Color)" />
<ColorAnimation Duration="0:0:0.1" Storyboard.TargetName="fore" Storyboard.TargetProperty="(Border.Background).(LinearGradientBrush.GradientStops)[1].(GradientStop.Color)" />
</Storyboard>
</BeginStoryboard>
</Trigger.ExitActions>
</Trigger>
<!--按钮失效-->
<Trigger Property="IsEnabled" Value="False">
<Setter Property="Foreground" Value="#B444"/>
<Trigger.EnterActions>
<BeginStoryboard>
<Storyboard>
<DoubleAnimation To="0" Duration="0:0:0.3" Storyboard.TargetName="back" Storyboard.TargetProperty="(Border.BitmapEffect).(OuterGlowBitmapEffect.GlowSize)" />
<DoubleAnimation To="1" Duration="0:0:0.1" Storyboard.TargetName="content" Storyboard.TargetProperty="(ContentPresenter.BitmapEffect).(DropShadowBitmapEffect.Opacity)" />
<DoubleAnimation To="-135" Duration="0:0:0.1" Storyboard.TargetName="content" Storyboard.TargetProperty="(ContentPresenter.BitmapEffect).(DropShadowBitmapEffect.Direction)" />
<ColorAnimation To="#FFF" Duration="0:0:0.3" Storyboard.TargetName="content" Storyboard.TargetProperty="(ContentPresenter.BitmapEffect).(DropShadowBitmapEffect.Color)" />
<ColorAnimation To="#D555" Duration="0:0:0.3" Storyboard.TargetName="fore" Storyboard.TargetProperty="(Border.BorderBrush).(SolidColorBrush.Color)" />
<ColorAnimation To="#CEEE" Duration="0:0:0.3" Storyboard.TargetName="fore" Storyboard.TargetProperty="(Border.Background).(LinearGradientBrush.GradientStops)[0].(GradientStop.Color)" />
<ColorAnimation To="#CDDD" Duration="0:0:0.3" Storyboard.TargetName="fore" Storyboard.TargetProperty="(Border.Background).(LinearGradientBrush.GradientStops)[1].(GradientStop.Color)" />
</Storyboard>
</BeginStoryboard>
</Trigger.EnterActions>
<Trigger.ExitActions>
<BeginStoryboard>
<Storyboard>
<DoubleAnimation Duration="0:0:0.1" Storyboard.TargetName="back" Storyboard.TargetProperty="(Border.BitmapEffect).(OuterGlowBitmapEffect.GlowSize)" />
<DoubleAnimation Duration="0:0:0.1" Storyboard.TargetName="content" Storyboard.TargetProperty="(ContentPresenter.BitmapEffect).(DropShadowBitmapEffect.Opacity)" />
<DoubleAnimation Duration="0:0:0.1" Storyboard.TargetName="content" Storyboard.TargetProperty="(ContentPresenter.BitmapEffect).(DropShadowBitmapEffect.Direction)" />
<ColorAnimation Duration="0:0:0.1" Storyboard.TargetName="content" Storyboard.TargetProperty="(ContentPresenter.BitmapEffect).(DropShadowBitmapEffect.Color)" />
<ColorAnimation Duration="0:0:0.1" Storyboard.TargetName="fore" Storyboard.TargetProperty="(Border.BorderBrush).(SolidColorBrush.Color)" />
<ColorAnimation Duration="0:0:0.1" Storyboard.TargetName="fore" Storyboard.TargetProperty="(Border.Background).(LinearGradientBrush.GradientStops)[0].(GradientStop.Color)" />
<ColorAnimation Duration="0:0:0.1" Storyboard.TargetName="fore" Storyboard.TargetProperty="(Border.Background).(LinearGradientBrush.GradientStops)[1].(GradientStop.Color)" />
</Storyboard>
</BeginStoryboard>
</Trigger.ExitActions>
</Trigger>
</ControlTemplate.Triggers>
</ControlTemplate>
</Setter.Value>
</Setter>
</Style>
</Application.Resources>
</Application>
看了先不要头大,我们先看看最终效果,然后回过头来再解释代码:
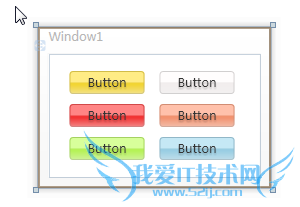
这是常规样式
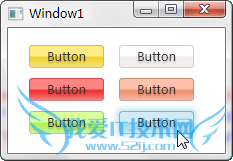
这个是鼠标移到上面时的样式
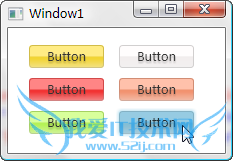
这个是鼠标点击时的样式

还有就是按钮失效时的样式
效果还算不错吧,下面来讲解代码喽,头晕的同学可以现在就收拾东西回家了哈。
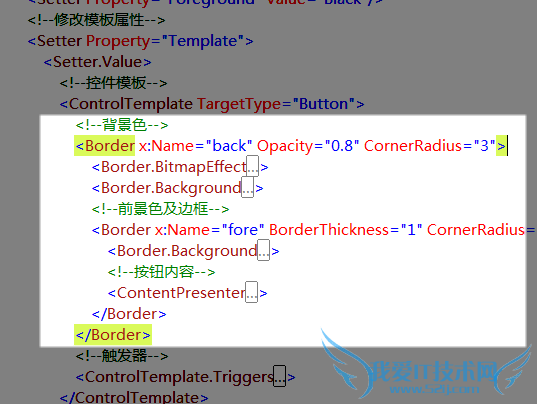
我们先来看这个命名为“back”的 Border 元素,它用它的 Background 属性充当了整个按钮的背景色。
| 以下为引用的内容: <Border.Background> |
其背景所用的是一个渐变笔刷,起始值和中间值都是引用的按钮本身的背景色,就是我们之前设置过的颜色啦,终止值是白色,这样通过位置调整,我们可以在按钮最下部产生一些向白色的过度色彩效果。
| 以下为引用的内容: <Border.BitmapEffect> <OuterGlowBitmapEffect Opacity="0.7" GlowSize="0" GlowColor="{Binding RelativeSource={RelativeSource TemplatedParent}, Path=(Button.Background).(SolidColorBrush.Color)}" /> </Border.BitmapEffect> |
它的 BitmapEffect 属性我们设置了一个大小为 0 的外发光效果,平常是看不见这效果的,在这里预先设置好,是为了在鼠标移入、按下时实现动画使用。
再来看看这个命名为“fore”的 Border 元素,它实现的是按钮的边框和高亮反光效果,我为它设置了一个半透明的黑色1像素边框,使得这个边框的色彩可以和背景色混合起来。
| 以下为引用的内容: <Border.Background> <LinearGradientBrush StartPoint="0,0" EndPoint="0,1"> <GradientBrush.GradientStops> <GradientStopCollection> <GradientStop Color="#6FFF" Offset="0.5"/> <GradientStop Color="#1111" Offset="0.51"/> </GradientStopCollection> </GradientBrush.GradientStops> </LinearGradientBrush> </Border.Background> |
它的背景同样采用的渐变笔刷,起始值和终止值的位置几乎贴在一起,从而形成比较鲜明的反光度对比。
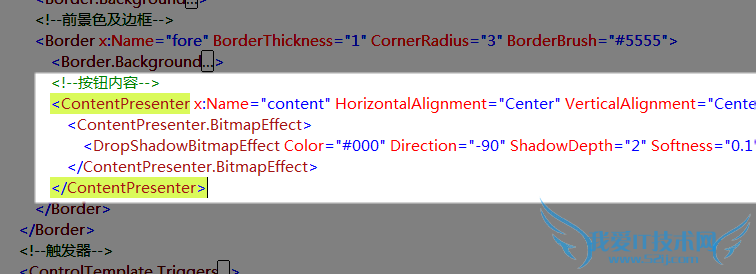
ContentPresenter 元素用于呈现按钮原本的内容,对于按钮来说就是按钮上的文字了,当然也可能会存在图片或其它东西。
| 以下为引用的内容: <ContentPresenter.BitmapEffect> <DropShadowBitmapEffect Color="#000" Direction="-90" ShadowDepth="2" Softness="0.1" Opacity="0.3" /> </ContentPresenter.BitmapEffect> |
我为之加了一个不太明显的阴影滤镜以增强显示效果。
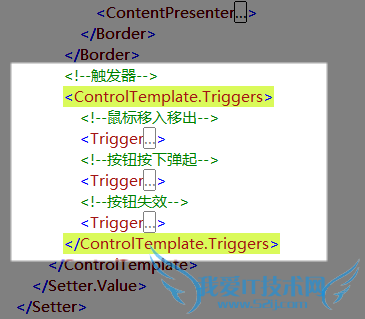
剩下的就是些可爱又该死的 Trigger ,我们通过这些触发器来改变按钮在不同状态时的外观。
| 以下为引用的内容: <!--鼠标移入移出--> <Trigger Property="IsMouseOver" Value="True"> <Trigger.EnterActions> <BeginStoryboard> <Storyboard> <DoubleAnimation To="6" Duration="0:0:0.2" Storyboard.TargetName="back" Storyboard.TargetProperty="(Border.BitmapEffect).(OuterGlowBitmapEffect.GlowSize)" /> <ColorAnimation To="#AFFF" BeginTime="0:0:0.2" Duration="0:0:0.2" Storyboard.TargetName="fore" Storyboard.TargetProperty="(Border.Background).(LinearGradientBrush.GradientStops)[0].(GradientStop.Color)" /> <ColorAnimation To="#3FFF" BeginTime="0:0:0.2" Duration="0:0:0.2" Storyboard.TargetName="fore" Storyboard.TargetProperty="(Border.Background).(LinearGradientBrush.GradientStops)[1].(GradientStop.Color)" /> </Storyboard> </BeginStoryboard> </Trigger.EnterActions> <Trigger.ExitActions> <BeginStoryboard> <Storyboard> <DoubleAnimation Duration="0:0:0.2" Storyboard.TargetName="back" Storyboard.TargetProperty="(Border.BitmapEffect).(OuterGlowBitmapEffect.GlowSize)" /> <ColorAnimation Duration="0:0:0.2" Storyboard.TargetName="fore" Storyboard.TargetProperty="(Border.Background).(LinearGradientBrush.GradientStops)[0].(GradientStop.Color)" /> <ColorAnimation Duration="0:0:0.2" Storyboard.TargetName="fore" Storyboard.TargetProperty="(Border.Background).(LinearGradientBrush.GradientStops)[1].(GradientStop.Color)" /> </Storyboard> </BeginStoryboard> </Trigger.ExitActions> </Trigger> |
在鼠标移入按钮时,我依次创建了改变外发光效果大小、改变上部反光区域颜色、改变下部反光区域颜色的动画,这里的要点就在于“Storyboard.TargetProperty="(Border.Background).(LinearGradientBrush.GradientStops)[1].(GradientStop.Color)"”属性设置语句,琢磨一下你就能看出这是对属性路径的描述,只不过它们写起来和看起来都很让人生气。
| 以下为引用的内容: <!--按钮按下弹起--> <Trigger Property="IsPressed" Value="True"> <Trigger.EnterActions> <BeginStoryboard> <Storyboard> <DoubleAnimation To="3" Duration="0:0:0.1" Storyboard.TargetName="back" Storyboard.TargetProperty="(Border.BitmapEffect).(OuterGlowBitmapEffect.GlowSize)" /> <ColorAnimation To="#3AAA" Duration="0:0:0.1" Storyboard.TargetName="fore" Storyboard.TargetProperty="(Border.Background).(LinearGradientBrush.GradientStops)[0].(GradientStop.Color)" /> <ColorAnimation To="#2111" Duration="0:0:0.1" Storyboard.TargetName="fore" Storyboard.TargetProperty="(Border.Background).(LinearGradientBrush.GradientStops)[1].(GradientStop.Color)" /> </Storyboard> </BeginStoryboard> </Trigger.EnterActions> <Trigger.ExitActions> <BeginStoryboard> <Storyboard> <DoubleAnimation Duration="0:0:0.1" Storyboard.TargetName="back" Storyboard.TargetProperty="(Border.BitmapEffect).(OuterGlowBitmapEffect.GlowSize)" /> <ColorAnimation Duration="0:0:0.1" Storyboard.TargetName="fore" Storyboard.TargetProperty="(Border.Background).(LinearGradientBrush.GradientStops)[0].(GradientStop.Color)" /> <ColorAnimation Duration="0:0:0.1" Storyboard.TargetName="fore" Storyboard.TargetProperty="(Border.Background).(LinearGradientBrush.GradientStops)[1].(GradientStop.Color)" /> </Storyboard> </BeginStoryboard> </Trigger.ExitActions> </Trigger> |
按下和弹起按钮时,我们做了相似的动画改变,与前面相比只是数值略微不同。
| 以下为引用的内容: <!--按钮失效--> <Trigger Property="IsEnabled" Value="False"> <Setter Property="Foreground" Value="#B444"/> <Trigger.EnterActions> <BeginStoryboard> <Storyboard> <DoubleAnimation To="0" Duration="0:0:0.3" Storyboard.TargetName="back" Storyboard.TargetProperty="(Border.BitmapEffect).(OuterGlowBitmapEffect.GlowSize)" /> <DoubleAnimation To="1" Duration="0:0:0.1" Storyboard.TargetName="content" Storyboard.TargetProperty="(ContentPresenter.BitmapEffect).(DropShadowBitmapEffect.Opacity)" /> <DoubleAnimation To="-135" Duration="0:0:0.1" Storyboard.TargetName="content" Storyboard.TargetProperty="(ContentPresenter.BitmapEffect).(DropShadowBitmapEffect.Direction)" /> <ColorAnimation To="#FFF" Duration="0:0:0.3" Storyboard.TargetName="content" Storyboard.TargetProperty="(ContentPresenter.BitmapEffect).(DropShadowBitmapEffect.Color)" /> <ColorAnimation To="#D555" Duration="0:0:0.3" Storyboard.TargetName="fore" Storyboard.TargetProperty="(Border.BorderBrush).(SolidColorBrush.Color)" /> <ColorAnimation To="#CEEE" Duration="0:0:0.3" Storyboard.TargetName="fore" Storyboard.TargetProperty="(Border.Background).(LinearGradientBrush.GradientStops)[0].(GradientStop.Color)" /> <ColorAnimation To="#CDDD" Duration="0:0:0.3" Storyboard.TargetName="fore" Storyboard.TargetProperty="(Border.Background).(LinearGradientBrush.GradientStops)[1].(GradientStop.Color)" /> </Storyboard> </BeginStoryboard> </Trigger.EnterActions> <Trigger.ExitActions> <BeginStoryboard> <Storyboard> <DoubleAnimation Duration="0:0:0.1" Storyboard.TargetName="back" Storyboard.TargetProperty="(Border.BitmapEffect).(OuterGlowBitmapEffect.GlowSize)" /> <DoubleAnimation Duration="0:0:0.1" Storyboard.TargetName="content" Storyboard.TargetProperty="(ContentPresenter.BitmapEffect).(DropShadowBitmapEffect.Opacity)" /> <DoubleAnimation Duration="0:0:0.1" Storyboard.TargetName="content" Storyboard.TargetProperty="(ContentPresenter.BitmapEffect).(DropShadowBitmapEffect.Direction)" /> <ColorAnimation Duration="0:0:0.1" Storyboard.TargetName="content" Storyboard.TargetProperty="(ContentPresenter.BitmapEffect).(DropShadowBitmapEffect.Color)" /> <ColorAnimation Duration="0:0:0.1" Storyboard.TargetName="fore" Storyboard.TargetProperty="(Border.BorderBrush).(SolidColorBrush.Color)" /> <ColorAnimation Duration="0:0:0.1" Storyboard.TargetName="fore" Storyboard.TargetProperty="(Border.Background).(LinearGradientBrush.GradientStops)[0].(GradientStop.Color)" /> <ColorAnimation Duration="0:0:0.1" Storyboard.TargetName="fore" Storyboard.TargetProperty="(Border.Background).(LinearGradientBrush.GradientStops)[1].(GradientStop.Color)" /> </Storyboard> </BeginStoryboard> </Trigger.ExitActions> </Trigger> |
当按钮失效时,我要改变很多东西,首先将文字颜色设为灰色,然后依次创建了改变外发光效果大小、改变内容阴影效果不透明度、改变内容阴影效果角度、改变内容阴影效果颜色、改变按钮边框颜色、改变上部反光区域颜色、改变下部反光区域颜色的动画。
这里将先前对内容应用的阴影效果彻底改变,使之产生凹陷的效果。
好了,到这里就下课啦,文章有点冗长了,但应该对新手很有帮助,老鸟估计现在已经梦游仙境了吧。
以上所分享的是关于WPF自定义漂亮的按钮样式,下面是编辑为你推荐的有价值的用户互动:
相关问题:用WPF 的xaml怎么写 才能做出像QQ里添加好友的按钮...
答:你好,参考下这篇经验:http://jingyan.baidu.com/article/ed2a5d1f36bcca09f6be17cb.html 附件也实现了你要的效果,根... >>详细
相关问题:wpf按钮样式加图片
答:1.图片问题,你可以做几个style继承那个style(Base on)就可以解决了。如: 然后在你的button中中指定这个style,如: 2. 你的资源文件保存成图片也不会难和发时间吧?如确要这么做,请参考 http://wenwen.soso.com/z/q265020563.htm >>详细
相关问题:WPF技术如何定义多种按钮样式 在APP。XAML中 写代码
答:新手的话,按楼上说的用Blend做,非常快速方便。 自己写的话如下: //Resources //然后,在Xaml中: 希望我的回答对你有所帮助。 >>详细
- 评论列表(网友评论仅供网友表达个人看法,并不表明本站同意其观点或证实其描述)
-