欢迎您访问我爱IT技术网,今天小编为你分享的编程技术是:【用Xaml做网页框架】,下面是详细的分享!
用Xaml做网页框架
下面就开始编写XAML,首先来定义一下页面的属性:
| 以下为引用的内容: <Page xmlns="http://schemas.microsoft.com/winfx/2006/xaml/presentation" xmlns:x="http://schemas.microsoft.com/winfx/2006/xaml" WindowTitle="MailMail" FontFamily="微软雅黑" Background="#FF424242" SnapsToDevicePixels="True"></Page> |
WindowTitle就是页面标题。
SnapsToDevicePixels属性很重要,它会使我们的图像自动进行像素对齐,从而去除模糊的边缘,这可以使我们的网页看起来更像传统网页。
接下来这一点很有趣,我们要在页面中放置ScrollViewer,否则我们的网页超出屏幕的时候不会显示滚动条,连这个都要我们自助使用了:
<ScrollViewer HorizontalScrollBarVisibility="Auto" VerticalScrollBarVisibility="Auto"></ScrollViewer>
把横向和纵向滚动条的显示属性都设为Auto是个比较好的方案,这样在不需要的时候就会自动隐藏了。
ScrollViewer中要放置一个Grid用于总体布局:
| 以下为引用的内容: <Grid MinHeight="900" MinWidth="1000"> <Grid.ColumnDefinitions> <ColumnDefinition Width="8*"/> <ColumnDefinition Width="84*"/> <ColumnDefinition Width="8*"/> </Grid.ColumnDefinitions> </Grid> |
其中定义了三个列,两边8%留作空白,中间84%是页面主体。
在Grid里放置DockPanel用于细化布局:<DockPanel Background="#FFF" Grid.Column="1"></DockPanel>
DockPanel中装载的就是页面的各个区块了:
| 以下为引用的内容: <DockPanel x:Name="Head" DockPanel.Dock="Top" Background="#FF4A4A4A" Height="115"></DockPanel> <Border x:Name="HeadLine" Background="#888" BorderThickness="0,1" DockPanel.Dock="Top" Height="15"></Border> <Grid x:Name="Show" Background="#EEE" DockPanel.Dock="Top" Height="135" ClipToBounds="True"></Grid> <Border x:Name="Channel" DockPanel.Dock="Top" Height="50" Background="#FF8E45" BorderThickness="0,1,0,0" BorderBrush="#FFF"></Border> <Border x:Name="Footer" Background="#666" BorderBrush="#888" BorderThickness="0,4,0,0" DockPanel.Dock="Bottom" Height="55"></Border> <DockPanel x:Name="Body" Background="#FFFFFCD1"></DockPanel> |
仅仅通过DockPanel.Dock属性就可以将各个区块完美的放置到它所应处的位置,实际应用中可以比这复杂很多,但实现起来依然是非常简单。
PS:掌握了WPF布局后,再去其他环境中布局,都会有捶墙的冲动~
现在我们的界面就是下面这样了:
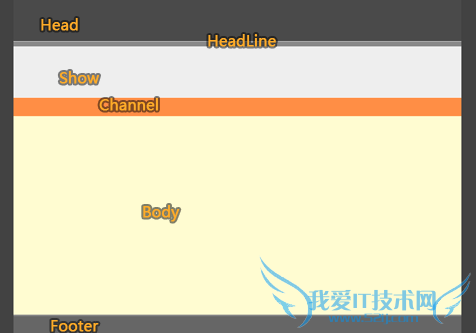
我把每个区块都命名并对应到此图上,这只是为了便于理解,并不是必需的。
在Body中加入两个区块,即边栏和内容:
| 以下为引用的内容: <DockPanel x:Name="Side" Background="#1E874900" DockPanel.Dock="Right" Width="245"></DockPanel> <StackPanel x:Name="Content"></StackPanel> |
其实不用Body,直接把这两个元素放在上层使用也没有问题,我在这里是希望它们有一个共同的背景才这样设计的。
<Page
xmlns="http://schemas.microsoft.com/winfx/2006/xaml/presentation"
xmlns:x="http://schemas.microsoft.com/winfx/2006/xaml"
WindowTitle="MailMail"
FontFamily="微软雅黑"
Background="#FF424242"
SnapsToDevicePixels="True">
<ScrollViewer HorizontalScrollBarVisibility="Auto" VerticalScrollBarVisibility="Auto">
<Grid MinHeight="900" MinWidth="1000">
<Grid.ColumnDefinitions>
<ColumnDefinition Width="8*"/>
<ColumnDefinition Width="84*"/>
<ColumnDefinition Width="8*"/>
</Grid.ColumnDefinitions>
<DockPanel Background="#FFF" Grid.Column="1">
<DockPanel x:Name="Head" DockPanel.Dock="Top" Background="#FF4A4A4A" Height="115"></DockPanel>
<Border x:Name="HeadLine" Background="#888" BorderThickness="0,1" DockPanel.Dock="Top" Height="15"></Border>
<Grid x:Name="Show" Background="#EEE" DockPanel.Dock="Top" Height="135" ClipToBounds="True"></Grid>
<Border x:Name="Channel" DockPanel.Dock="Top" Height="50" Background="#FF8E45" BorderThickness="0,1,0,0" BorderBrush="#FFF"></Border>
<Border x:Name="Footer" Background="#666" BorderBrush="#888" BorderThickness="0,4,0,0" DockPanel.Dock="Bottom" Height="55"></Border>
<DockPanel x:Name="Body" Background="#FFFFFCD1">
<DockPanel x:Name="Side" DockPanel.Dock="Right" Width="245"></DockPanel>
<StackPanel x:Name="Content"></StackPanel>
</DockPanel>
</DockPanel>
</Grid>
</ScrollViewer>
</Page>
导出的XAML内容如下:
| 以下为引用的内容: Code <ResourceDictionary xmlns="http://schemas.microsoft.com/winfx/2006/xaml/presentation" xmlns:x="http://schemas.microsoft.com/winfx/2006/xaml"> <DrawingBrush x:Key="back" Stretch="Uniform"> <DrawingBrush.Drawing> <DrawingGroup ClipGeometry="F1 M 0,0L 395.017,0L 395.017,466L 0,466L 0,0"> <DrawingGroup.Children> <GeometryDrawing Geometry="F1 M 64,5.5L 331.017,5.5"> <GeometryDrawing.Pen> <Pen Thickness="11" LineJoin="Round" Brush="#08000000"/> </GeometryDrawing.Pen> </GeometryDrawing> <GeometryDrawing Geometry="F1 M 64,122.5L 331.017,122.5"> <GeometryDrawing.Pen> <Pen Thickness="128" LineJoin="Round" Brush="#06000000"/> </GeometryDrawing.Pen> </GeometryDrawing> <GeometryDrawing Geometry="F1 M 64,428.501L 331.017,428.501"> <GeometryDrawing.Pen> <Pen Thickness="75" LineJoin="Round" Brush="#06000000"/> </GeometryDrawing.Pen> </GeometryDrawing> <GeometryDrawing Geometry="F1 M 64,275.5L 331.017,275.5"> <GeometryDrawing.Pen> <Pen Thickness="35" LineJoin="Round" Brush="#0B000000"/> </GeometryDrawing.Pen> </GeometryDrawing> </DrawingGroup.Children> </DrawingGroup> </DrawingBrush.Drawing> </DrawingBrush> </ResourceDictionary> |
我们需要给“<DrawingBrush x:Key="back" Stretch="Uniform">”中加入几个属性:ViewportUnits="Absolute" Viewport="0,0,55,145" TileMode="FlipXY"
这些属性控制了图像的填充方式。
现在回到主文档,准备载入这个背景,先将其以资源字典的形式引用:
| 以下为引用的内容: <Page.Resources> <ResourceDictionary> <ResourceDictionary.MergedDictionaries> <ResourceDictionary Source="back.xaml"/> </ResourceDictionary.MergedDictionaries> </ResourceDictionary> </Page.Resources> |
然后为Grid加入背景属性设置:
<Grid MinHeight="900" MinWidth="1000" Background="{StaticResource back}">
这样就完成了页面背景样式的设置。
你会发觉页面主体的部分区块与页面背景的边际不够明显:
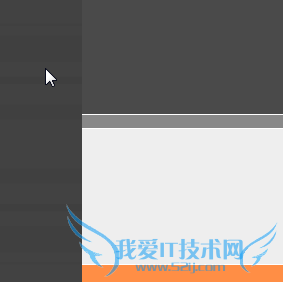
我们可以使用伪阴影来突出主体,即通过在页面主题两侧加入两个黑色到透明的渐变,我们通过在Grid中加入两个矩形来实现:
| 以下为引用的内容:
<Rectangle.Fill> <LinearGradientBrush StartPoint="1,0" EndPoint="0,0"> <GradientStop Color="#00000000" Offset="1" /> <GradientStop Color="#20000000" Offset="0" /> </LinearGradientBrush> </Rectangle.Fill> </Rectangle> <Rectangle Width="20" Grid.Column="3" HorizontalAlignment="Left" Margin="0,0,0,0"> <Rectangle.Fill> <LinearGradientBrush StartPoint="1,0" EndPoint="0,0"> <GradientStop Color="#00000000" Offset="0" /> <GradientStop Color="#20000000" Offset="1" /> </LinearGradientBrush> </Rectangle.Fill> </Rectangle> |
<Page
xmlns="http://schemas.microsoft.com/winfx/2006/xaml/presentation"
xmlns:x="http://schemas.microsoft.com/winfx/2006/xaml"
WindowTitle="MailMail"
FontFamily="微软雅黑"
Background="#FF424242"
SnapsToDevicePixels="True">
<Page.Resources>
<ResourceDictionary>
<ResourceDictionary.MergedDictionaries>
<ResourceDictionary Source="back.xaml"/>
</ResourceDictionary.MergedDictionaries>
</ResourceDictionary>
</Page.Resources>
<ScrollViewer HorizontalScrollBarVisibility="Auto" VerticalScrollBarVisibility="Auto">
<Grid MinHeight="900" MinWidth="1000" Background="{StaticResource back}">
<Grid.ColumnDefinitions>
<ColumnDefinition Width="8*"/>
<ColumnDefinition Width="84*"/>
<ColumnDefinition Width="8*"/>
</Grid.ColumnDefinitions>
<Rectangle Width="20" Grid.Column="0" HorizontalAlignment="Right" Margin="0,0,0,0">
<Rectangle.Fill>
<LinearGradientBrush StartPoint="1,0" EndPoint="0,0">
<GradientStop Color="#00000000" Offset="1" />
<GradientStop Color="#20000000" Offset="0" />
</LinearGradientBrush>
</Rectangle.Fill>
</Rectangle>
<Rectangle Width="20" Grid.Column="3" HorizontalAlignment="Left" Margin="0,0,0,0">
<Rectangle.Fill>
<LinearGradientBrush StartPoint="1,0" EndPoint="0,0">
<GradientStop Color="#00000000" Offset="0" />
<GradientStop Color="#20000000" Offset="1" />
</LinearGradientBrush>
</Rectangle.Fill>
</Rectangle>
<DockPanel Background="#FFF" Grid.Column="1">
<DockPanel x:Name="Head" DockPanel.Dock="Top" Background="#FF4A4A4A" Height="115"></DockPanel>
<Border x:Name="HeadLine" Background="#888" BorderThickness="0,1" DockPanel.Dock="Top" Height="15"></Border>
<Grid x:Name="Show" Background="#EEE" DockPanel.Dock="Top" Height="135" ClipToBounds="True"></Grid>
<Border x:Name="Channel" DockPanel.Dock="Top" Height="50" Background="#FF8E45" BorderThickness="0,1,0,0" BorderBrush="#FFF"></Border>
<Border x:Name="Footer" Background="#666" BorderBrush="#888" BorderThickness="0,4,0,0" DockPanel.Dock="Bottom" Height="55"></Border>
<DockPanel x:Name="Body" Background="#FFFFFCD1">
<DockPanel x:Name="Side" Background="#1E874900" DockPanel.Dock="Right" Width="245"></DockPanel>
<StackPanel x:Name="Content"></StackPanel>
</DockPanel>
</DockPanel>
</Grid>
</ScrollViewer>
</Page>
以上所分享的是关于用Xaml做网页框架,下面是编辑为你推荐的有价值的用户互动:
相关问题:网页里,怎样使用框架?
答:给你个例子,自己看看,试着修改! 教学评价系统 //顶部页面 //左侧页面 //中间主页面 >>详细
相关问题:怎么可以最简单的使用div+css制作网页框架
答:1、布局先把大框架确定,再逐步把内部的细节构建出来,从层级关系来看就是由外往内布局; 2、如果你对divcss不是很熟悉,那么你可以先以图片作为背景图片代替 3、如果对布局定位不是很熟练,那么可以暂时以绝对位置来布局 4、自己不熟悉的情况下... >>详细
相关问题:网页制作中的框架怎么用啊?几个页面啊?
答:加代码:第一步: 第二步:上面设的名字是main,把连接的目标转向main就行了" target="main"> 例: 网易 qq >>详细
- 评论列表(网友评论仅供网友表达个人看法,并不表明本站同意其观点或证实其描述)
-