欢迎您访问我爱IT技术网,今天小编为你分享的电脑教程是网络协议方面的经验知识教程:Bonding配置,下面是详细的分享!
Bonding配置
bonding:将多个物理网卡聚合成一个虚拟网卡,这样可以增加流量,增大负载。
bonding三个工作模式:
0:负载均衡。默认是轮询模式。
1:主机-备机模式。
3:广播-容错,所有的包通过所有的slave口接受广播
配置bonding:
vi /etc/modprobe.d/bonding.conf
alias bond0 bonding
options bond0 miimon=100(ms毫秒) mode=0(bonding工作模式)
miimon=100:系统每100ms监测一次链路状态。
alias bond1 bonding
options bond1 miimon=100 mode=0
alias bond2 bonding
options bond2 miimon=100 mode=1
加载bonding模块
depmod
modprobe bonding
lsmod | grep bonding
bonding 107911 0
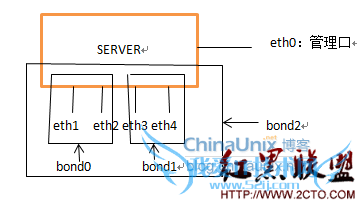
现在添加4块网卡,2块聚合bond0,2块聚合bond1,最后bond0和bond1聚合成bond2。
每个物理网卡都这样配
vi ifcfg-ethX
DEVICE="eth1" #是什么设备就写什么
NM_CONTROLLED="no"
ONBOOT=yes
BOOTPROTO=none
SLAVE=yes
MASTER=bond0 #eth1,eth2写bond0;eth3,eth4写bond1
ifcfg-bond0和ifcfg-bond1都按如下方式写
vi ifcfg-bond0
DEVICE="bond0" #是什么设备就写什么
NM_CONTROLLED="no"
ONBOOT="yes"
BOOTPROTO=static
SLAVE=yes
MASTER=bond2
按照上面方法配完以后,我写了一个脚本便于查看bonding启动状态的
#!/bin/bash
choice="$1"
case "$choice" in
start) #由于在重启网络的时候可能会出现网卡没有起来,所以最好手动起一遍
/etc/init.d/network restart
ifup eth1
ifup eth2
ifup eth3
ifup eth4
;;
stop)
ifdown eth1
ifdown eth2
ifdown eth3
ifdown eth4
;;
status) #bonding状态的文件可以在/proc/net/bonding和/sys/class/net下进行查看
/etc/init.d/network status
echo -e "\n######################This is bond0:#################"
cat /proc/net/bonding/bond0
echo -e "\n####################This is bond1:###################"
cat /proc/net/bonding/bond1
echo -e "\n##########This is bond2:#############################"
cat /proc/net/bonding/bond2
;;
*)
echo "Usage:{start|stop|status}"
;;
esac
测试:
sar -n DEV 2 1000

可以查看每个网口数据流量的

当把eth1和eth2关闭的时候bond2正常运行。
作者 alan9101
以上就是关于Bonding配置的网络协议知识分享,更多电脑教程请移步到>>电脑教程。
- 评论列表(网友评论仅供网友表达个人看法,并不表明本站同意其观点或证实其描述)
-