JBPM之小试牛刀
首先google下载JBPM4.4,下载后解压得到如图目录结构:
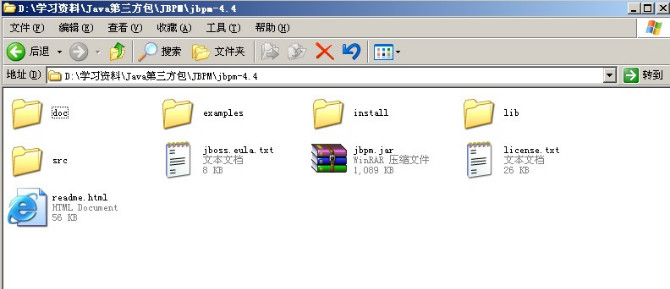
doc目录下是jbpm源码运行javadoc命令生成的HTML形式的API文档,
examples目录下是jbpm自带的示例程序
install目录下是jbpm为用户制作的运用ANT工具来一键式安装jbpm
lib目录下是jbpm依赖的第三方jar类库
src目录下是jbpm的源码
jbpm.jar是jbpm自身的jar文件,其他的就是一些jbpm的开源协议及版权说明及自身的描述说明。
首先要做的就是搭建jbpm的开发环境,由于jbpm4.4要求Eclipse版本是3.4.2版本以上,而MyEclipse6.5的Eclipse版本是3.3,所以你要使用Jbpm4.4,不好意思,请安装MyEclipse8.5版本或者以上,或者你使用低版本的JBPM3.x.我用的是MyEclipse8.6.
MyEclipse安装就不说了,JBPM解压到D盘就行,主要是GPD插件的安装,GPD插件方便我们在MyEclipse中通过图形化的方式来创建我们的流程定义,当然你够牛叉,手写XML来编写流程定义也行。至于插件如何安装,这个很简单,GPD插件不用单独去下载,下载下来的JBPM4.4中自带了GPD插件,在install\src\gpd下,把它解压到D盘gpd/eclipse文件夹下,在Myeclipse8.6安装目录下的dropins下新建个gpd.link文件,内容就是你gpd插件的解压路径,这个几乎是所有MyEclipse插件的安装方法,也是我个人比较喜欢的插件安装方法,因为他对MyEclipse本身是无污染的,卸载该插件只需删除link文件即可。插件安装自己多尝试,不行再尝试,没什么好说的。
下面开始写个示例程序演示如何在web中发布流程、管理流程:
首先新建个web项目,名字随便取,我的命名为jbpm4web
然后就是搭建JBPM的运行环境,第一步,导入jar,
jbpm.jar,以及jbpm/lib目录下的所有jar文件全部引入,为了简单起见,所以全部引入。
然后就是把jbpm-4.4\examples\src下的所有配置文件(css文件不要复制)都copy到工程的src目录下,到此jbpm的运行环境搭建完毕,
接着new一个jdpl.xml文件,通过GPD图形化设计器创建我们的流程定义:
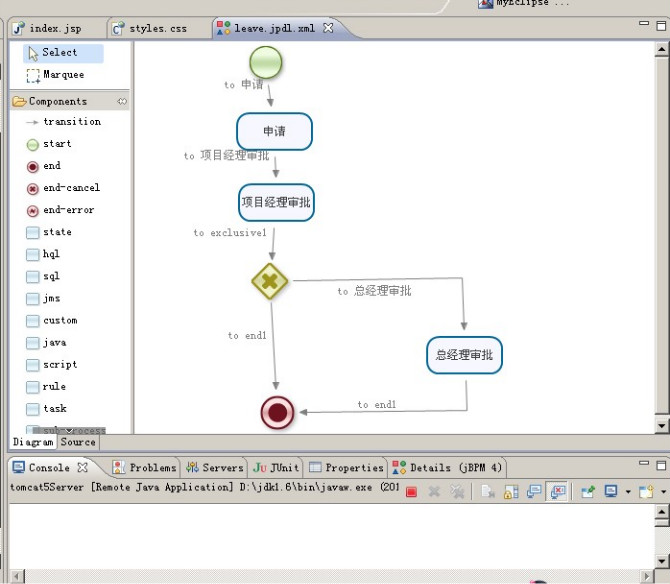
自动生成的xml文件内容如下:
<?xml version="1.0" encoding="UTF-8"?>
<process name="leave" xmlns="">
<start g="113,-2,48,48" name="start1">
<transition g="-47,-17" name="to 申请" to="申请"/>
</start>
<task assignee="lingo" g="100,68,92,52" name="申请">
<transition g="-95,-17" name="to 项目经理审批" to="项目经理审批"/>
</task>
<task assignee="manager" g="102,142,92,52" name="项目经理审批">
<transition g="-83,-17" name="to exclusive1" to="exclusive1"/>
</task>
<decision g="117,226,48,48" name="exclusive1" expr="#{day > 3?'to 总经理审批':'to end1'}">
<transition g="341,246:-130,8" name="to 总经理审批" to="总经理审批"/>
<transition g="-47,-17" name="to end1" to="end1"/>
</decision>
<task assignee="boss" g="298,301,92,52" name="总经理审批">
<transition g="346,384:-114,-12" name="to end1" to="end1"/>
</task>
<end g="125,363,48,48" name="end1"/>
</process>
中途可能会遇到jdpl文件中文乱码问题,这时可以在你MyEclipse安装目录下找到eclipse.ini文件,在里面加上
-file.encoding=UTF-8
然后重启你的MyEclipse即可。
然后编写servlet处理流程的发布和管理:
我的示例代码如下,仅供参考:
LeaveServlet.java
package servlet;
import java.io.IOException;
import java.io.PrintWriter;
import java.util.ArrayList;
import java.util.List;
import entity.Process;
import javax.servlet.ServletException;
import javax.servlet.http.HttpServlet;
import javax.servlet.http.HttpServletRequest;
import javax.servlet.http.HttpServletResponse;
import org.jbpm.api.Configuration;
import org.jbpm.api.ProcessDefinition;
import org.jbpm.api.ProcessEngine;
import org.jbpm.api.RepositoryService;
/**
* @author Lanxiaowei
* @createTime 2011-12-24 下午04:09:55
*/
public class LeaveServlet extends HttpServlet {
private ProcessEngine processEngine = null;
private RepositoryService repositoryService;
@Override
public void init() throws ServletException {
super.init();
processEngine = Configuration.getProcessEngine();
repositoryService = processEngine.getRepositoryService();
}
public void doGet(HttpServletRequest request, HttpServletResponse response) throws ServletException, IOException {
String operate = request.getParameter("opt");
//发布流程定义
if("deploy".equals(operate)){
repositoryService.createDeployment().addResourceFromClasspath("leave.jpdl.xml").deploy();
} else if("delete".equals(operate)){ //删除流程定义
String id = request.getParameter("id");
repositoryService.deleteDeploymentCascade(id);
}
List<Process> processes = new ArrayList<Process>();
List<ProcessDefinition> list = repositoryService.createProcessDefinitionQuery().list();
for (ProcessDefinition pd : list) {
Process process = new Process(
pd.getId(), pd.getName(), pd.getKey(), pd.getVersion() + "",
pd.getDeploymentId()
);
processes.add(process);
}
request.setAttribute("ps", processes);
request.getRequestDispatcher("/index.jsp").forward(request, response);
}
@Override
protected void doPost(HttpServletRequest req, HttpServletResponse resp) throws ServletException, IOException {
doGet(req, resp);
}
}
Process.java仅仅是为了封装数据而自定义个的一个Java VO,
package entity;
/**
* 流程定义对象
* @author Lanxiaowei
* @createTime 2011-12-24 下午04:23:44
*/
public class Process {
private String id;
private String name;
private String key;
private String version;
private String deployMentId;
public String getId() {
return id;
}
public void setId(String id) {
this.id = id;
}
public String getName() {
return name;
}
public void setName(String name) {
this.name = name;
}
public String getKey() {
return key;
}
public void setKey(String key) {
this.key = key;
}
public String getVersion() {
return version;
}
public void setVersion(String version) {
this.version = version;
}
public String getDeployMentId() {
return deployMentId;
}
public void setDeployMentId(String deployMentId) {
this.deployMentId = deployMentId;
}
public Process(){}
public Process(String id, String name, String key, String version, String deployMentId) {
super();
this.id = id;
this.name = name;
this.key = key;
this.version = version;
this.deployMentId = deployMentId;
}
}
然后编写index.jsp页面展示数据:
<%@ page language="java" import="java.util.*" pageEncoding="UTF-8"%>
<%@ page isELIgnored="false" %>
<%@ taglib uri="/jstl" prefix="c" %>
<%
String path = request.getContextPath();
String basePath = request.getScheme()+"://"+request.getServerName()+":"+request.getServerPort()+path+"/";
request.setAttribute("basepath",basePath);
%>
<!DOCTYPE HTML PUBLIC "-//W3C//DTD HTML 4.01 Transitional//EN">
<html>
<head>
<base href="<%=basePath%>">
<title>My JSP 'index.jsp' starting page</title>
<meta http-equiv="pragma" content="no-cache">
<meta http-equiv="cache-control" content="no-cache">
<meta http-equiv="expires" content="0">
<meta http-equiv="keywords" content="keyword1,keyword2,keyword3">
<meta http-equiv="description" content="This is my page">
<link rel="stylesheet" type="text/css" href="css/styles.css">
</head>
<body>
<center>
<h2>流程发布与管理Demo</h2>
</center>
<div id="test">
<span style="margin-bottom:5px;float:left;">
<input type="button" value=" deploy " onclick="window.location='${basepath}LeaveServlet?opt=deploy';"/>
</span>
<table border="1" cellspacing="0" cellpadding="0">
<tr>
<td>id</td>
<td>name</td>
<td>key</td>
<td>version</td>
<td>deploymentId</td>
<td>operation</td>
</tr>
<c:forEach items="${ps}" var="p">
<tr>
<td>${p.id}</td>
<td>${p.name}</td>
<td>${p.key}</td>
<td>${p.version}</td>
<td>${p.deployMentId}</td>
<td>
<a href="javascript:void(0);" onclick="javascript:window.location='${basepath}LeaveServlet?opt=delete&id=${p.deployMentId}';return false;" >remove</a>
</td>
</tr>
</c:forEach>
</table>
</div>
</body>
</html>
index.jsp页面用到了JSTL标签库,所以需要把jstl标签库tld文件copy到WEB-INF目录下,web.xml里配置jstl标签库在tomcat容器启动时的自动加载,
<?xml version="1.0" encoding="UTF-8"?>
<web-app version="2.5"
xmlns="">
<servlet>
<description>This is the description of my J2EE component</description>
<display-name>This is the display name of my J2EE component</display-name>
<servlet-name>LeaveServlet</servlet-name>
<servlet-class>servlet.LeaveServlet</servlet-class>
</servlet>
<servlet-mapping>
<servlet-name>LeaveServlet</servlet-name>
<url-pattern>/LeaveServlet</url-pattern>
</servlet-mapping>
<jsp-config>
<taglib>
<taglib-uri>/jstl</taglib-uri>
<taglib-location>/WEB-INF/jstl-core.tld</taglib-location>
</taglib>
</jsp-config>
<welcome-file-list>
<welcome-file>index.jsp</welcome-file>
</welcome-file-list>
</web-app>
最后把项目部署到Tomcat5.0,然后运行测试,如果你部署到tomcat6.0,会报jar文件冲突,经过google,才知道原来是juel.jar与tomcat6.0 lib目录下的el-api.jar冲突,要么你把tomcat6.0下的el-api.jar替换成juel.jar,或者你保留juel.jar使用tomcat5..0,我采用后者,反正tomcat5.0才6-7M,下个解压版解压即可完成安装,然后MyEclipse里配置下tomcat5.0的安装路径为你本地的tomcat5的解压路径即可。部署后运行效果图:

这个示例只是演示了如何创建流程,发布流程,如何删除流程,尚未真正和实际业务结合处理流程,下一步目标就是真正实现一个web版的请假流程管理程序,嘻嘻!!!
本文来源 我爱IT技术网 http://www.52ij.com/jishu/89.html 转载请保留链接。
- 评论列表(网友评论仅供网友表达个人看法,并不表明本站同意其观点或证实其描述)
-