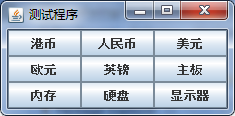
GridLayout布局管理器
package edu.sdkd.ch05;
//这段代码主要是为读者展示如何使用GridLayout布局管理器,在程序中将九个普通按钮组件按照此布局管理器放置在内容面板中。
import javax.swing.*;
import java.awt.*;
public class test5
{
static final int WIDTH=300;
static final int HEIGHT=200;
public static void main(String[] args)
{
JFrame jf=new JFrame("测试程序");
jf.setSize(WIDTH,HEIGHT);
jf.setDefaultCloseOperation(JFrame.EXIT_ON_CLOSE);
jf.setVisible(true);
JPanel contentPane=new JPanel();
jf.setContentPane(contentPane);
JButton b1=new JButton("港币");
JButton b2=new JButton("人民币");
JButton b3=new JButton("美元");
JButton b4=new JButton("欧元");
JButton b5=new JButton("英镑");
JButton b6=new JButton("主板");
JButton b7=new JButton("内存");
JButton b8=new JButton("硬盘");
JButton b9=new JButton("显示器");
GridLayout gird=new GridLayout(3,3); //创建一个 GridLayout布局管理器对象,将之行数设为3,列数设为3,并且将之作为中间容器的布局管理器
contentPane.setLayout(gird);
contentPane.add(b1); //将九个普通按钮组件一一添加到中间容器中
contentPane.add(b2);
contentPane.add(b3);
contentPane.add(b4);
contentPane.add(b5);
contentPane.add(b6);
contentPane.add(b7);
contentPane.add(b8);
contentPane.add(b9);
jf.pack();
}
}
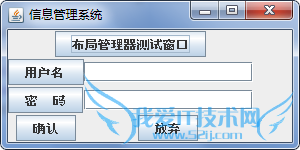
GridBagLayout布局管理器
package edu.sdkd.ch05;
//这段代码主要是为读者展示如何使用GridBagLayout布局管理器布局方式来排列内容面板中的组件
import javax.swing.*;
import java.awt.*;
import java.awt.event.*;
class login extends JPanel//此处类继承了JPanel类
{
static final int WIDTH=300;
static final int HEIGHT=150;
JFrame loginframe;
public void add(Component c,GridBagConstraints constraints,int x,int y,int w,int h)
{ //此方法用来添加控件到容器中
constraints.gridx=x;
constraints.gridy=y;
constraints.gridwidth=w;
constraints.gridheight=h;
add(c,constraints);
}
login()
{
loginframe=new JFrame("信息管理系统"); //设置顶层容器
loginframe.setDefaultCloseOperation(JFrame.EXIT_ON_CLOSE);//设置其顶层容器的关闭性
GridBagLayout lay=new GridBagLayout();//创建网格组布局方式对象
setLayout(lay);
loginframe.add(this, BorderLayout.WEST);
//这个相当于是在contentpane上添加panel组件
loginframe.setSize(WIDTH,HEIGHT);
Toolkit kit=Toolkit.getDefaultToolkit();//设置顶层容器框架为居中
Dimension screenSize=kit.getScreenSize();
int width=screenSize.width;
int height=screenSize.height;
int x=(width-WIDTH)/2;
int y=(height-HEIGHT)/2;
loginframe.setLocation(x,y);
JButton ok=new JButton("确认");
JButton cancel=new JButton("放弃");
JButton title=new JButton("布局管理器测试窗口");
JButton name=new JButton("用户名 ");
JButton password=new JButton("密 码");
final JTextField nameinput=new JTextField(15);
final JTextField passwordinput=new JTextField(15);
GridBagConstraints constraints=new GridBagConstraints();
constraints.fill=GridBagConstraints.NONE;
// constraints.anchor=GridBagConstraints.CENTER; /组件的对齐方式 选择
constraints.weightx=3;
constraints.weighty=4;
//x,y方向的增量 比例
add(title,constraints,0,0,5,1); //使用网格组布局添加控件
add(name,constraints,0,1,1,1);
add(password,constraints,0,2,1,1);
add(nameinput,constraints,2,1,2,1);
add(passwordinput,constraints,2,2,2,1);
add(ok,constraints,0,3,1,1);
add(cancel,constraints,2,3,1,1);
//loginframe.setResizable(false);
loginframe.setVisible(true);
}
}
public class test7
{
public static void main(String[] args)
{
login log=new login();
}
}
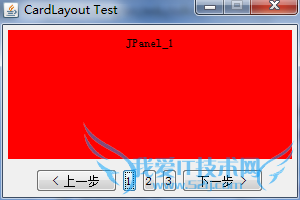
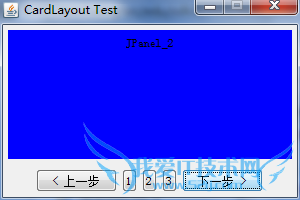
CardLayout布局管理器
package edu.sdkd.ch05;
//这段程序代码主要是为读者展示如何使用CardLayout布局管理器针对内容面板中的组件进行布局
import java.awt.BorderLayout;
import java.awt.CardLayout;
import java.awt.Color;
import java.awt.Insets;
import java.awt.event.ActionEvent;
import java.awt.event.ActionListener;
import javax.swing.JButton;
import javax.swing.JFrame;
import javax.swing.JLabel;
import javax.swing.JPanel;
import javax.swing.UIManager;
public class test8 extends JFrame
{
private JPanel pane=null; // 主要的JPanel,该JPanel的布局管理将被设置成CardLayout
private JPanel p=null; // 放按钮的JPanel
private CardLayout card=null; // CardLayout布局管理器
private JButton button_1=null; // 上一步
private JButton button_2=null; // 下一步
private JButton b_1=null, b_2=null, b_3=null; // 三个可直接翻转到JPanel组件的按钮
private JPanel p_1=null, p_2=null, p_3=null; // 要切换的三个JPanel
public test8()
{
super("CardLayout Test");
try {
// 将LookAndFeel设置成Windows样式
UIManager.setLookAndFeel("com.sun.java.swing.plaf.windows.WindowsLookAndFeel");
} catch (Exception ex){
ex.printStackTrace();
}
card=new CardLayout(5, 5); //创建一个具有指定的水平和垂直间隙的新卡片布局
pane=new JPanel(card);
//pane 的布局管理将被设置成CardLayout
p=new JPanel(); // 构造放按钮的JPanel
button_1=new JButton("< 上一步");
button_2=new JButton("下一步 >");
b_1=new JButton("1");
b_2=new JButton("2");
b_3=new JButton("3");
b_1.setMargin(new Insets(2,2,2,2));
b_2.setMargin(new Insets(2,2,2,2));
b_3.setMargin(new Insets(2,2,2,2));
//Insets(int, int, int, int)
//用指定的上、下、左、右四个空白宽度,创建且初始化一个新的 Insets 对象。
p.add(button_1);
p.add(b_1);
p.add(b_2);
p.add(b_3);
p.add(button_2);
p_1=new JPanel();
p_2=new JPanel();
p_3=new JPanel();
p_1.setBackground(Color.RED);
p_2.setBackground(Color.BLUE);
p_3.setBackground(Color.GREEN);
p_1.add(new JLabel("JPanel_1"));
p_2.add(new JLabel("JPanel_2"));
p_3.add(new JLabel("JPanel_3"));
pane.add(p_1, "p1");
pane.add(p_2, "p2");
pane.add(p_3, "p3");
//下面是翻转到卡片布局的某个组件的动作事件处理,当单击某个普通按钮组件,就会触发出现下一个组件
button_1.addActionListener(new ActionListener()
{
/// 上一步的按钮动作
public void actionPerformed(ActionEvent e) {
card.previous(pane); //card布局管理器自身具有一些方法可以直接调用
}
});
button_2.addActionListener(new ActionListener()
{
// 下一步的按钮动作
public void actionPerformed(ActionEvent e) {
card.next(pane);
}
});
b_1.addActionListener(new ActionListener()
{
// 直接翻转到p_1
public void actionPerformed(ActionEvent e) {
card.show(pane, "p1");
}
});
b_2.addActionListener(new ActionListener()
{
// 直接翻转到p_2
public void actionPerformed(ActionEvent e) {
card.show(pane, "p2");
}
});
b_3.addActionListener(new ActionListener()
{
// 直接翻转到p_3
public void actionPerformed(ActionEvent e) {
card.show(pane, "p3");
}
});
this.getContentPane().add(pane,BorderLayout.CENTER);
this.getContentPane().add(p, BorderLayout.SOUTH);//按钮p
this.setDefaultCloseOperation(JFrame.EXIT_ON_CLOSE);
this.setSize(300, 200);
this.setVisible(true);
//this.res
this.setResizable(false);
}
public static void main(String[] args) {
new test8();
}
}
BoxLayout 布局管理器
package edu.sdkd.ch05;
//这段程序主要是为读者展示如何使用BoxLayout 布局管理器针对组件进行布局
import javax.swing.*;
import java.awt.*;
public class test9
{
public static void main(String[] args)
{
BoxLayoutFrame frame1=new BoxLayoutFrame();
frame1.setDefaultCloseOperation(JFrame.EXIT_ON_CLOSE);
frame1.show();
}
}
class BoxLayoutFrame extends JFrame
{
private static final int WIDTH=300;
private static final int HEIGHT=200;
public BoxLayoutFrame()
{
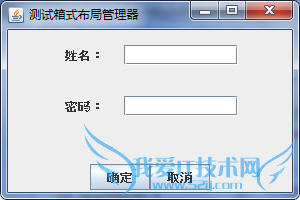
setTitle("测试箱式布局管理器");//设置顶层容器名称、大小
setSize(WIDTH,HEIGHT);
Container con=getContentPane();//创建一个中间容器
JLabel label1=new JLabel(" 姓名:");//创建标签组件、文本框组件
JTextField textField1=new JTextField(10);
textField1.setMaximumSize(textField1.getPreferredSize());
Box hbox1=Box.createHorizontalBox();//创建一个水平箱子
hbox1.add(label1); //在水平箱子上添加一个标签组件,并且创建一个不可见的、20个单位的组件。在这之后再添加一个文本框组件
hbox1.add(Box.createHorizontalStrut(20));
hbox1.add(textField1);
JLabel label2=new JLabel(" 密码:");//创建标签组件、文本框组件
JTextField textField2=new JTextField(10);
textField2.setMaximumSize(textField2.getPreferredSize());
Box hbox2=Box.createHorizontalBox();//创建一个水平箱子
hbox2.add(label2); //在水平箱子上添加一个标签组件,并且创建一个不可见的、20个单位的组件。在这之后再添加一个文本框组件
hbox2.add(Box.createHorizontalStrut(20));
hbox2.add(textField2);
JButton button1=new JButton("确定");//创建两个普通按钮组件,并且创建一个水平箱子,将两个按钮添加到箱子中
JButton button2=new JButton("取消");
Box hbox3=Box.createHorizontalBox();
hbox3.add(button1);
hbox3.add(button2);
Box vbox=Box.createVerticalBox();//创建一个垂直箱子,这个箱子将两个水平箱子添加到其中,创建一个横向 glue 组件。
vbox.add(hbox1);
vbox.add(hbox2);
vbox.add(Box.createVerticalGlue());
vbox.add(hbox3);
con.add(vbox,BorderLayout.CENTER); // 将垂直箱子添加到BorderLayout布局管理器中的中间位置
}
}
- 评论列表(网友评论仅供网友表达个人看法,并不表明本站同意其观点或证实其描述)
-