目前Ant工具已经内嵌为Eclipse IDE的一部份,因此我们不需要额外再安装Ant plugin套件,其使用方法极为简单,完整的操作流程可参考下列说明:
1. 开启您的Eclipse IDE,建立一个TestProject的项目之后,于src/jcode/test套件目录底下
新增HelloTest类别且于程式进入点的main()函式,加入以下的一段程式代码:
public static void main(String[] args) {
System.out.println("Hello, everybody!");
}
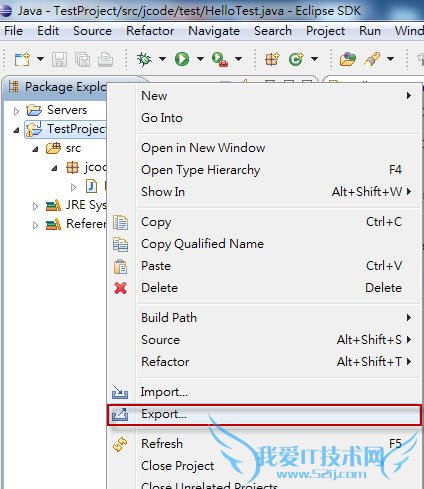
2. 把滑鼠移至TestProject的图示,然后点击右键,出现上下文选单(context menu)点取Export项目,
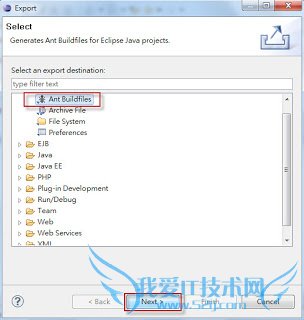
画面带出如下图的"Export"对话框,选择"Ant Buildfiles"图示,来产出TestProject的build.xml文件档:
3. 打开build.xml文档,并且对该文件进行局部性的修改,其修改过的程式代码以红色粗体字表示。
<?xml version="1.0" encoding="UTF-8" standalone="no"?>
<project basedir="." default="build" name="TestProject">
<property environment="env"/>
<property name="ECLIPSE_HOME" value="../../../eclipse-sdk-helios"/>
<property name="debuglevel" value="source,lines,vars"/>
<property name="target" value="1.6"/>
<property name="source" value="1.6"/>
<property name="dist" location="dist"/>
<path id="TestProject.classpath">
<pathelement location="bin"/>
<pathelement location="../../../jar-lib/ojdbc14.jar"/>
</path>
<target name="init">
<mkdir dir="bin"/>
<copy includeemptydirs="false" todir="bin">
<fileset dir="src">
<exclude name="**/*.launch"/>
<exclude name="**/*.java"/>
</fileset>
</copy>
</target>
<target name="clean">
<delete dir="bin"/>
</target>
<target depends="clean" name="cleanall"/>
<!--target depends="build-subprojects,build-project" name="build"/-->
<target depends="dist" name="build"/>
<target name="build-subprojects"/>
<target depends="init" name="build-project">
<echo message="${ant.project.name}: ${ant.file}"/>
<javac debug="true" debuglevel="${debuglevel}" destdir="bin" source="${source}" target="${target}">
<src path="src"/>
<classpath refid="TestProject.classpath"/>
</javac>
</target>
<target name="dist" depends="build-subprojects,build-project" description="generate the distribution" >
<!-- 创建放置jar文件目录 -->
<mkdir dir="${dist}b"/>
<!-- 把build目录内的所有文件打包成一个TestProject.jar文件 -->
<jar jarfile="${dist}b/${ant.project.name}.jar" basedir="bin"/>
</target>
<target description="Build all projects which reference this project. Useful to propagate changes." name="build-refprojects"/>
<target description="copy Eclipse compiler jars to ant lib directory" name="init-eclipse-compiler">
<copy todir="${ant.library.dir}">
<fileset dir="${ECLIPSE_HOME}/plugins" includes="org.eclipse.jdt.core_*.jar"/>
</copy>
<unzip dest="${ant.library.dir}">
<patternset includes="jdtCompilerAdapter.jar"/>
<fileset dir="${ECLIPSE_HOME}/plugins" includes="org.eclipse.jdt.core_*.jar"/>
</unzip>
</target>
<target description="compile project with Eclipse compiler" name="build-eclipse-compiler">
<property name="build.compiler" value="org.eclipse.jdt.core.JDTCompilerAdapter"/>
<antcall target="build"/>
</target></project>
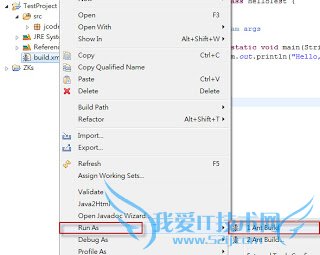
4. 将滑鼠指标移动到build.xml图示,单点滑鼠右键后选取"Run As -> 1 Ant Build"项目执行,会于"Console"输出Ant的脚本代码:
Buildfile: D:\works\TestProject\build.xml
build-subprojects:
init:
build-project:
[echo] TestProject: D:\works\TestProject\build.xml
dist:
[mkdir] Created dir: D:\works\TestProject\dist\lib
[jar] Building jar: D:\works\TestProject\dist\lib\TestProject.jar
build:
BUILD SUCCESSFUL
Total time: 526 milliseconds
- 评论列表(网友评论仅供网友表达个人看法,并不表明本站同意其观点或证实其描述)
-